Language selection

Search

On this page

  1. Purpose
  2. FCAC Secure portal overview
  3. Account management
    1. Account contacts and security
    2. Account and contact creation
  4. User authentication
    1. Sign-up process
    2. Sign-in process
  5. Complaint reporting
    1. Uploading a complaints package
    2. Submitting a package
  6. Functional menu

1. Purpose

The purpose of this user guide is to provide a walkthrough of how to sign-up and log into FCAC’s Secure Portal (Portal). It is also intended as a step-by-step instruction guide for navigating the various functionalities. This user guide will be updated as required.

This user guide applies to Banks (including federal credit unions) and Authorized Foreign Banks (collectively referred to as “Banks”).

2. FCAC Secure portal overview

The Portal provides regulated entities (collectively, “RE”, “institutions”) with a method by which they comply with their legislative and supervisory reporting requirements and submit those reports to the Financial Consumer Agency of Canada (FCAC) (e.g., complaint records).

The Terms of Use set out the terms and conditions under which you may access and use the portal on behalf of your institution.

3. Account management

3.1 Account contacts and security

Each institution can have one or more portal users, to a maximum of 5. Each institution will have only 1 portal administrator (included as part of the maximum 5 users), who can administer the portal user access rights for their respective institution.

3.2 Account and contact creation

FCAC will request each institution to provide contacts for the Portal (to a maximum of 5) and identify one of those contact as the Portal AdminFootnote 1 role. Once that contact record is added to the system, the contact will receive an activation email to initiate portal access.

FCAC recommends portal users to use user IDs approved by their institution. Portal users who represent more than one institution must use a unique user ID for each institution they represent.

4. User authentication

4.1 Sign-up process

4.1.1

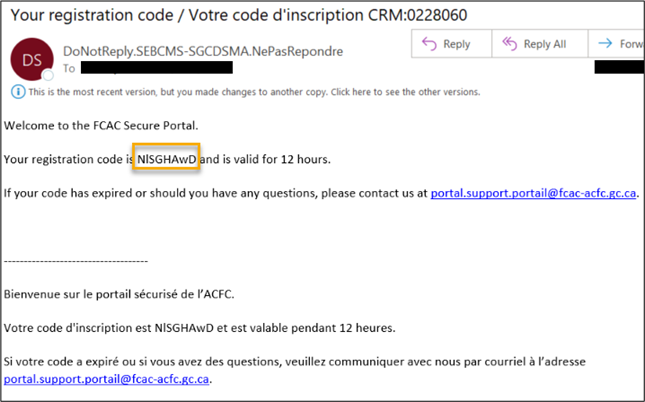
Once a contact is approved by FCAC, the Sign-up process is initiated. The user will receive the following email in their mailbox:

The email received by the user once approved by FCAC. The email contains a registration code which is valid for 12 hours.

4.1.2

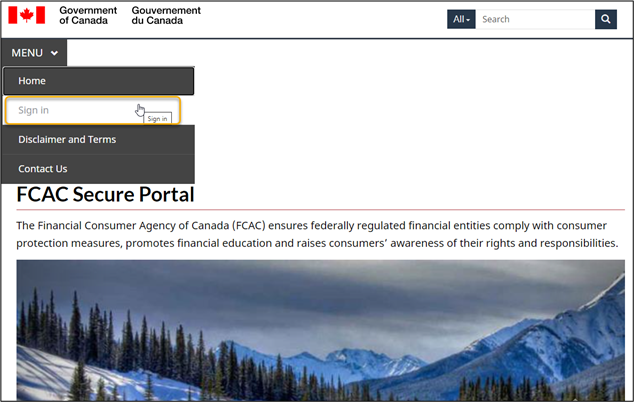
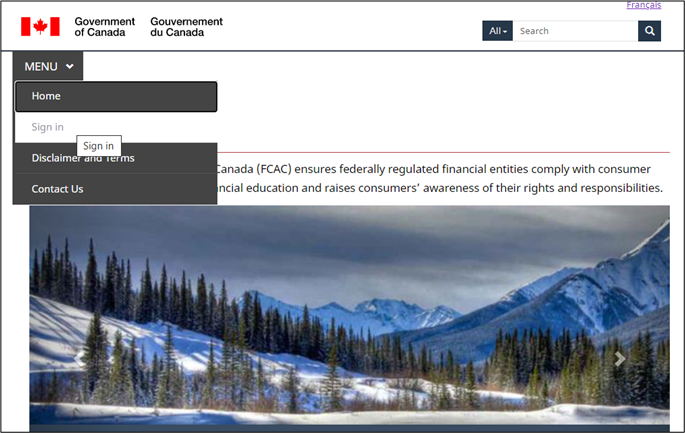
Navigate to the Portal Homepage and click on Sign-in:

From the homepage, click MENU and click Sign In.

4.1.3

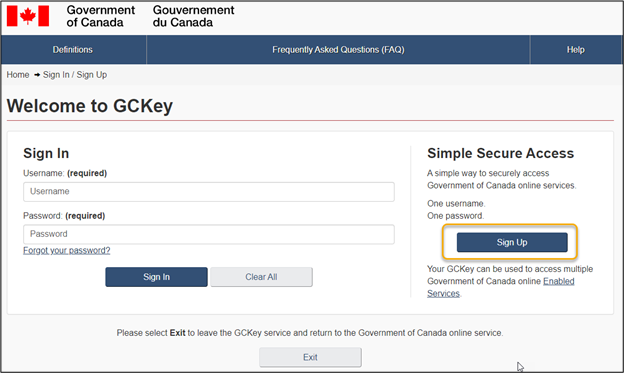
The user will be redirected to Sign-In Canada to generate a GCKeyFootnote 22. Select the Sign-Up button to the right of your screen.

The Sign in / Sign Up page is displayed. Click the Sign Up button from the right side of the screen under Simple Secure Access.

4.1.4

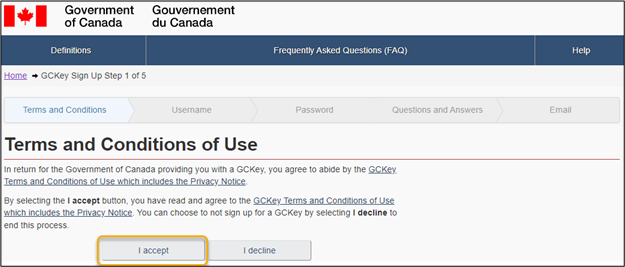
Please read the Terms and Conditions of Use. Select the I accept button after you have read the Terms and Conditions of Use.

The Terms and Conditions of Use page is displayed. I accept and I decline buttons are pictured below the terms and conditions of use.

4.1.5

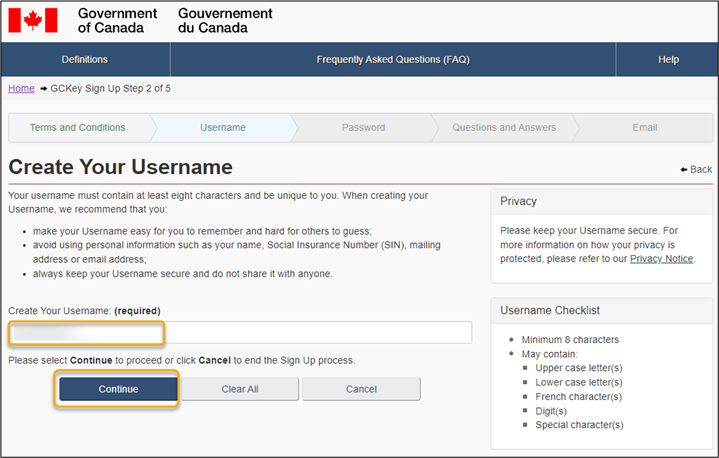
Create a username. We ask that you use usernames approved by your institution (e.g., johnsmithABCBank). Click Continue.

The Create Your Username page is displayed. The page provides recommendations and character requirements and allows the user to input a username.

4.1.6

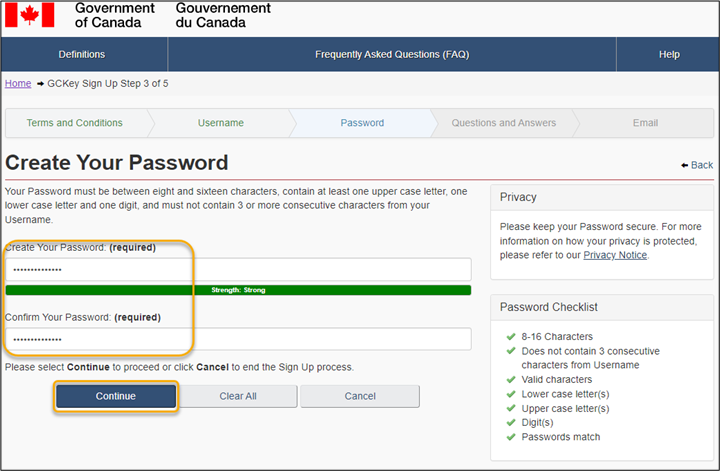
Create a password with a minimum 8-character length. Click Continue.

The Create Your Password page is displayed. The page provides character requirements and allows the user to input a password.

4.1.7

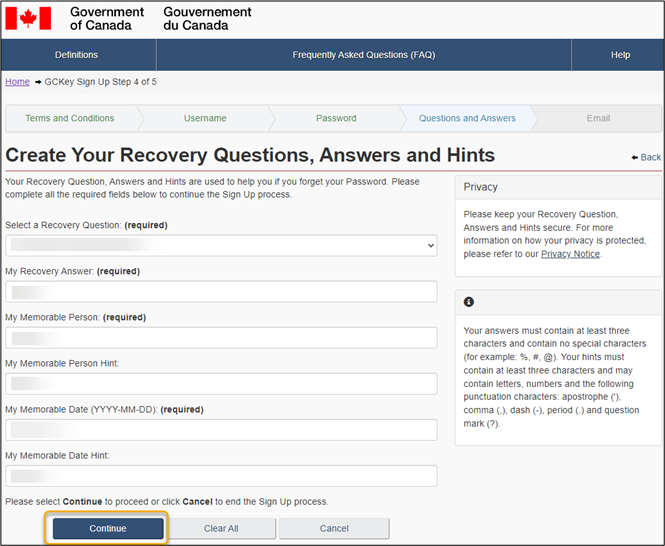
Choose your recovery questions, answer, and hints. Click Continue once complete.

The Create Your Recovery Questions, Answers and Hints page is displayed. The user must complete the required fields for password recovery.

4.1.8

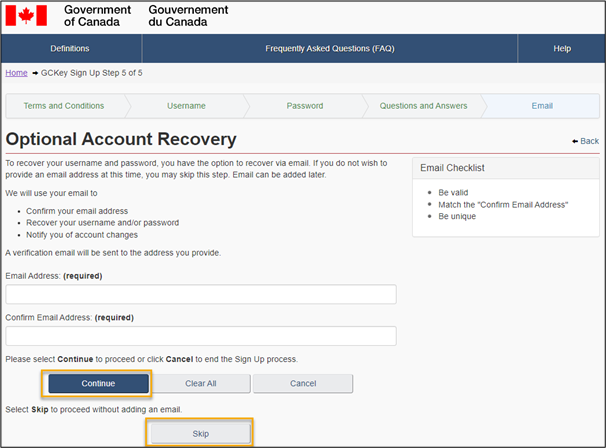
You have the option to recover your username and password via email. If you choose to proceed, enter your email address and click Continue. If you wish to proceed without adding an email, select Skip.

 The Optional Account Recovery page is displayed. The user may enter an email address for account recovery.

4.1.9

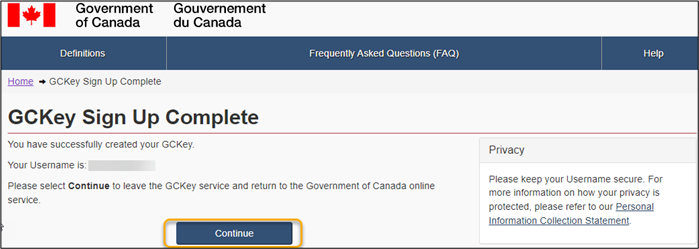
GCKey Sign up is complete. Click Continue.

The GCKey Sign Up Complete page is displayed. It confirms the successful creation of GCKey and the associated username.

4.1.10

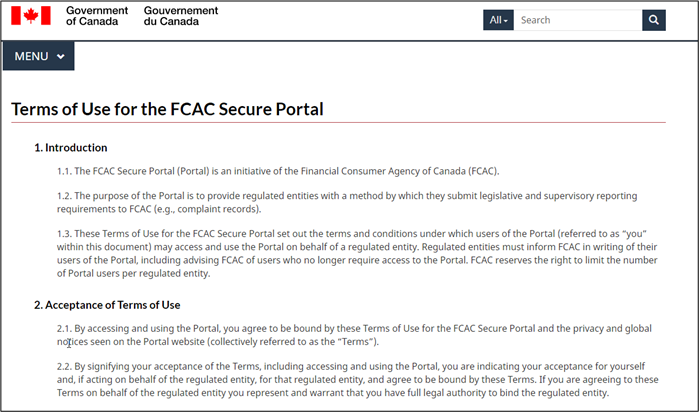
The user will be redirected to the Terms of Use for the FCAC Secure Portal. Please read and accept the Terms of Use. Click Submit.

The Terms of Use for the FCAC Secure Portal page is displayed. The user must accept the terms to proceed.

4.1.11

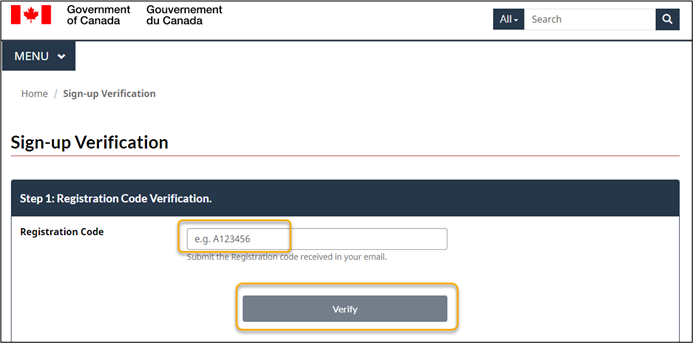
The user will be prompted to enter the Registration Code received in Step 4.1.1 Enter the Registration Code and click Verify.

The Sign-Up Verification page is displayed. A text box allowing the user to input their registration code and the Verify button are pictured.

4.1.12

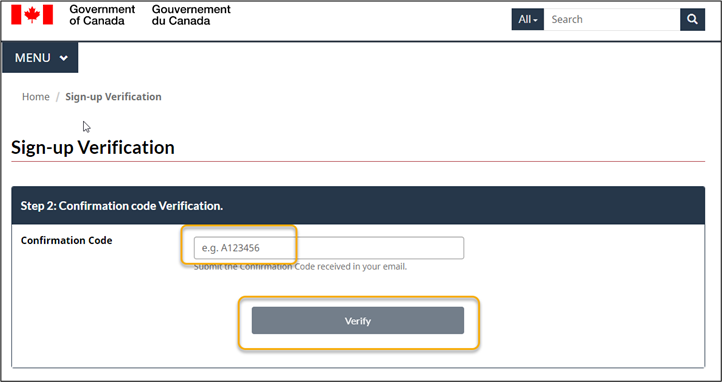
The user will then be prompted to enter a Confirmation Code. This code is automatically sent to the user once they have completed Step 4.1.10. This is the second step in the Sign-up process

The Sign-Up Verification page is displayed. A text box allowing the user to input their confirmation code and the Verify button are pictured.

4.1.13

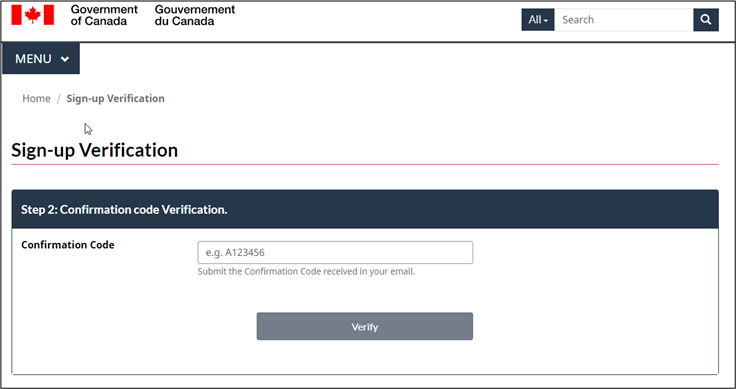
The user will receive a Confirmation Code once Step 4.1.10 is complete. This is the second step in the Sign-up process.

The email received by the user once the Terms of Use are accepted. The email contains a confirmation code which is valid for 12 hours.

4.1.14

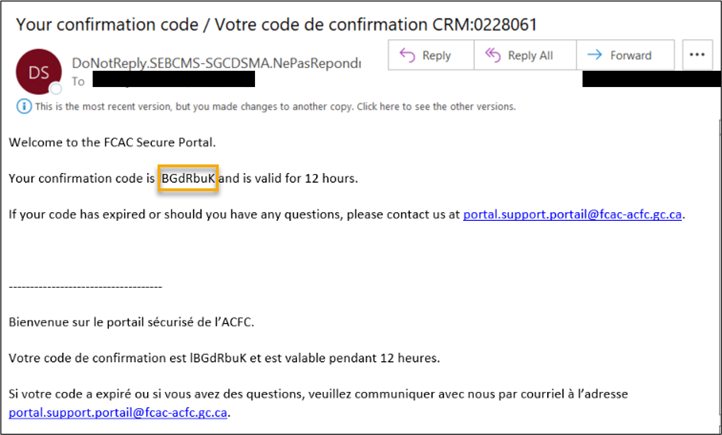
Enter the Confirmation Code received in Step 4.1.12 and click Verify.

The Sign-Up Verification page is displayed. A text box allowing the user to input their confirmation code and the Verify button are pictured.

4.1.15

The Sign-up process is complete. The user is redirected to the Portal homepage.

4.2 Sign-in process

4.2.1

Once a user has completed the Sign-in process (see Section 4.1), the user can access the Portal.

4.2.2

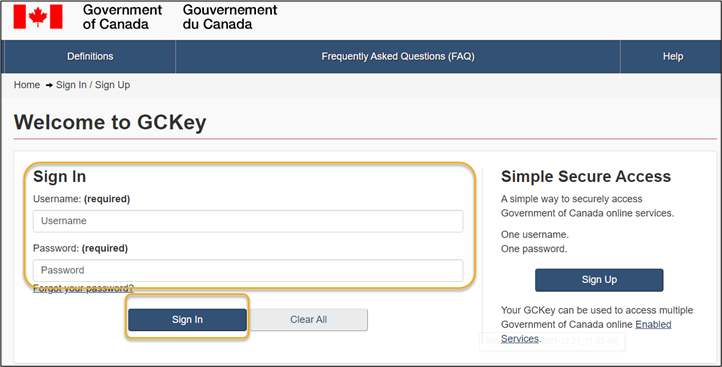
On the Portal homepage, click on Sign In.

The Portal Homepage is displayed. From the homepage, click MENU and click Sign In.

4.2.3

The user will be redirected to GCKey. Enter the Username and Password created in Step 4.1.6. Click Sign In.

The Sign in / Sign Up page is displayed. Text boxes to enter username and password are available below Sign In.

4.2.4

Once the user has been authenticated, click Continue.

The Welcome page is displayed. The user must click the continue button to proceed.

4.2.5

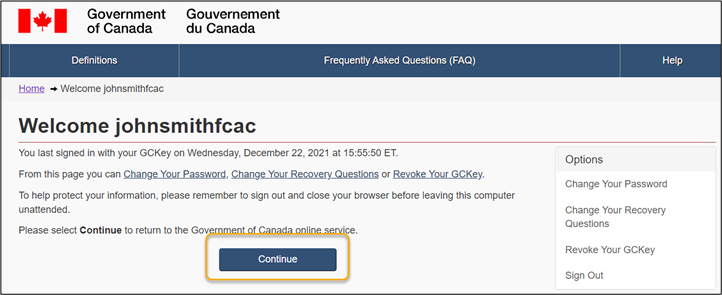
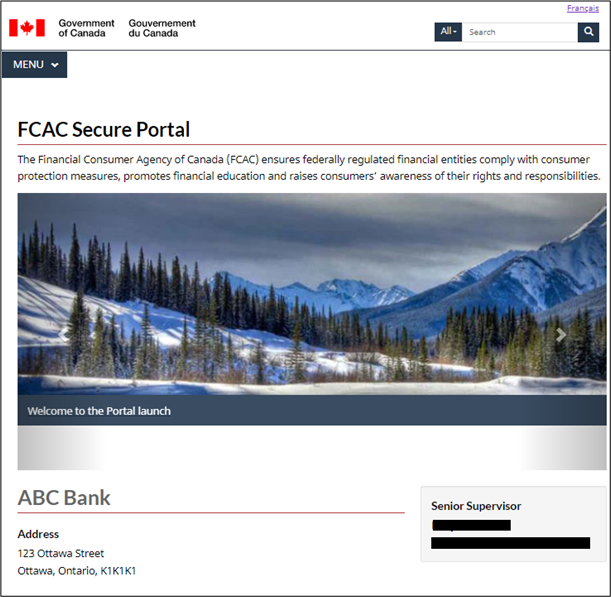
The Sign-in process is complete. The user is redirected to their institution’s landing page.

The institution’s landing page is displayed. It lists the institution’s address and the assigned Senior Supervisor’s contact information.

5. Complaint reporting

5.1 Uploading a complaints package

5.1.1

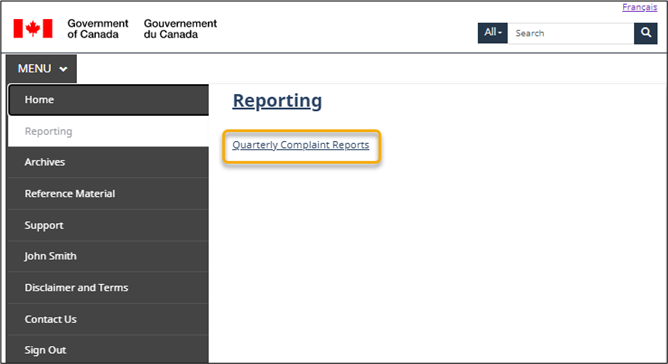
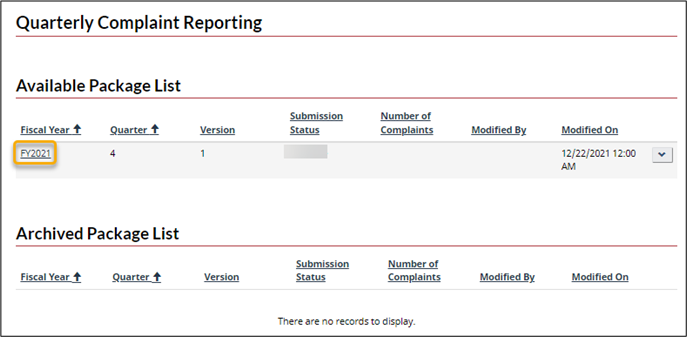
Click on Reporting – Quarterly Complaint Process to start the uploading process.

A Portal page is displayed. Click MENU, Reporting, and click Quarterly Complaint Reports.

5.1.2

Select the Package file for the respective quarter.

The Quarterly Complaint Reporting main page is displayed. The Package file is available from the Available Package List.

5.1.3

Once the package has been selected, JSON files can either be uploaded using the Upload selected files button or files can be dragged and dropped into the drop box.

The upload page is displayed. The user can click to choose a file to upload to the package or drag it in the file box.

5.1.4

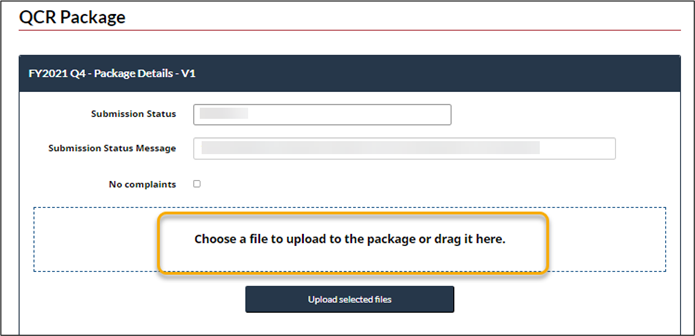
Once all JSON files are uploaded for the respective reporting quarters, click Upload selected files. If an institution does not have any complaints to report in the respective quarter, select No complaints.

The upload page is displayed. The Upload selected files button is located below the file box.

5.1.5

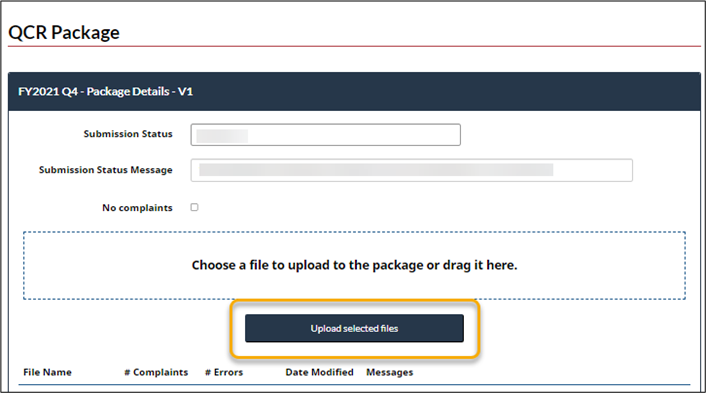
Upload process is complete.

5.2 Submitting a package

5.2.1

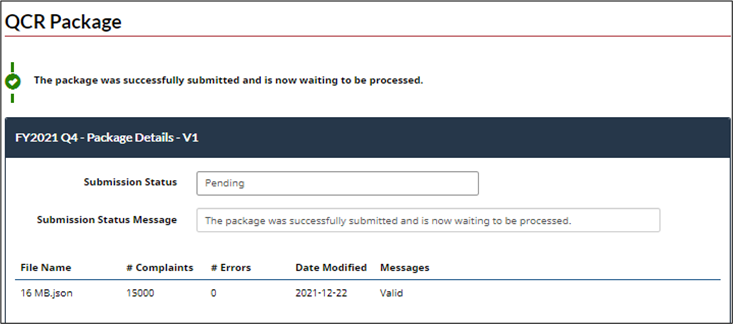
All files uploaded to the package must pass the validation phase prior to submission.

5.2.2

Once all the files are uploaded to the package pass the validation phase, the user can click on Submit package.

The upload page is displayed. The Submit package button is located below the list of uploaded files.

5.2.3

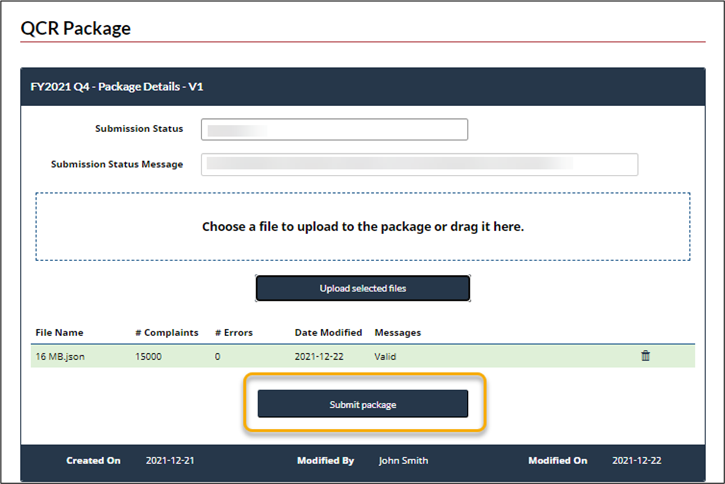
QCR Package successfully submitted. Submission process complete.

The upload page is displayed. The successful submission message appears at the top of the page, below the QCR Package header.

6. Functional menu

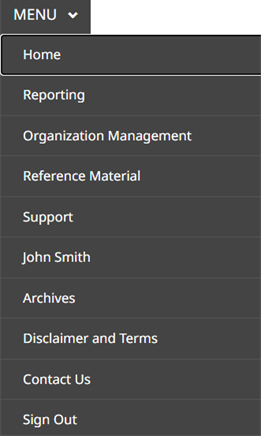
The menu is where users will find access to the various functional areas:

The MENU options are displayed.
  • Reporting
    • This is where users will find the reporting tools for their organization’s reporting requirements.
  • Organization management
    • This is where the Portal Administrator can view all actions completed by the institution’s users and manage user accounts.
  • Reference material
    • This area is where users will find frequently asked questions and answers, as well as other pertinent information.
  • Support
    • This is where users can submit questions and/or requests to FCAC (e.g., can’t access the reporting area, need to update a user, etc.).
  • User profile
    • This area allows users to manage their own contact information.
  • Archives
    • This is where users will find archived announcements, notifications, and activity history (please note only the organization’s Portal Admin will have access to all activity history, regular users will only have access to their own activity history).
  • Disclaimer and Terms
    • This is where users can access the Portal Terms of Use and the legal disclaimer.
  • Contact us
    • This section provides pertinent FCAC contact information.